Featured Post Today
print this page
Latest Post
Showing posts with label Graphic Software. Show all posts

Identify Color Harmonies with ColorSchemer Studio

Identify Color Harmonies with ColorSchemer Studio
For those of you who are feeling the difficulty in finding and identify color harmonies, ColorSchemer Studio is the perfect solution to determine the color of an attractive and professional. We as designers are
never out of color, because the colors we can make the work more lively and beautiful. So, for those who are difficult to manage and visualize color combinations, then they should familiarize themselves with color theory to study some sensitivity training, this graphic science has been formulated in conformity with the needs of these people.

Sometimes we can not determine the right color combination for a design, either because of lack of inspiration or understanding in processing the colors to be in accordance with the concept / brief, or might also because color blindness. There are several easy and professional solution to overcome this problem, you can read it at:

Color-related articles:

  1. Color Trends 2012 | Popular colors in 2012
  2. Tools for Choosing Color Combinations for Your Designs
  3. Color Psychology in Branding & Marketing
  4. 5 Important Points to Know About Color Theory
  5. Balance in Graphic Design

Maybe some of you have read this 5 color-related articles but still confused how to choose colors harmony, for that I will share with you a graphic design software that can be used as a tool in determining and selecting the best colors for your design portfolio.

This graphic design software named ColorSchemer, which has been tested by world class designers and is considered effective to choose a color harmony. I also have tried and the results are satisfactory. Through several steps you can already get an instant color harmonies combinations.

Identify Color Harmonies with ColorSchemer Studio


ColorSchemer Studio

ColorSchemer Studio is a professional color matching application that will help you build beautiful color schemes quickly and easily. Use ColorSchemer Studio to identify color harmonies for the web (RGB) or print (CMYK), create palettes from imported images, search and find thousands of color schemes that may be used.

ColorSchemer Studio 2 is a professional color matching application for anyone from hobbyists to advanced professionals. Work with a dynamic visual color wheel, instantly explore harmony relationships and even let ColorSchemer Studio intelligently suggest color schemes for you!

ColorSchemer Studio

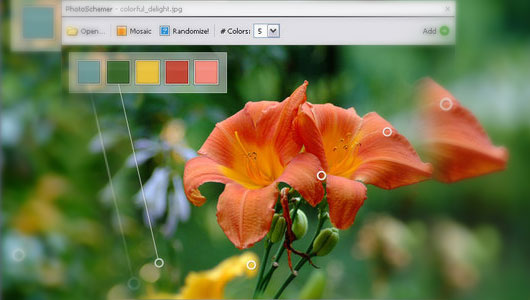
"Use the PhotoSchemer tool to build unique color schemes based on any picture, image or photograph. Just drop an image onto the program and let the PhotoSchemer do the rest!"
ColorSchemer Studio

Mix colors and create gradient blends: Use the built-in Color Mixer to create a single mixed color or a gradient path between two colors. or use the Variations palette to find colors that are similar or related to any starting base color. Use the Export Wizard to export your color schemes to a number of popular applications and formats:

HTML color chart
CSS style sheet
GIF image
NEW PNG image
NEW Adobe Swatch Exchange (.ase)
Photoshop Color Palette (.aco)
Illustrator Color Palette (.ai)
Macromedia FreeHand/Adobe FrameMaker
Corel Painter Color Set
Color Table file (.act)
NEW XML file (.xml)


Visit ColorSchemer StudioDownload ColorSchemer Studio

Create a Basic Page Layout in Adobe InDesign

Basic Page Layout InDesign
Adobe InDesign is one application of the Adobe family which may be rarely used, but some features in Adobe InDesign is quite powerful when used in conjunction with other graphics softwares. Adobe InDesign is generally used for: magazine lay-outing, newspapers lay-outing, books lay-outing, posters and all forms of print purposes especially those which are using more text in it, do that Adobe InDesign features layout management to take precedence over other graphical features in support those purpose.

In the world of graphic design, InDesign tutorials is still considered very rare. Perhaps because of the use of the software is still minor (compared to Illustrator, Photoshop, etc). In addition, the features are indeed very different from his brother Illustrator, Photoshop, etc. makes it seem complicated. 'Complicated' does not mean it can not be learned.

In this edition I'm going to share a little knowledge of InDesign, because of the many features that are interconnected for the purposes of layout .. I would probably repay the stage tutorial on InDesign. We'll start from the most basic and simple: "Create a Basic Page Layout in Adobe InDesign".

Basic Page Layout in Adobe InDesign: Tutorial


Step 1

Create a Basic Page Layout in Adobe InDesign

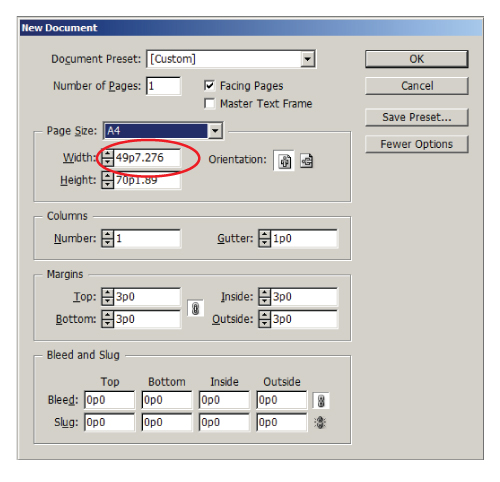
Open New Document (ctrl + N) on the File menu. You can adjust the paper size / work area in the "New Document" window . By default, InDesign displays the size in "picas (p0)", if you like to change into other measurement units you just simply type in the size of the full value with units of measure (eg: '32 cm '), after you enter a value In Design will automatically turn it back into the unit p0 (but dont worry, you can change all the settings of this size in Inch or centimeters later).

step 2

Create a Basic Page Layout in Adobe InDesign

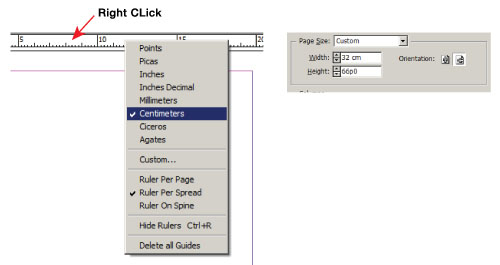
To change all the settings of the unit of measure, simply right click on the ruler (on the top and right side of work area), then select the size setting that you need. so all the settings in InDesign size would change according to size unit you choose.

step 3

Create a Basic Page Layout in Adobe InDesign

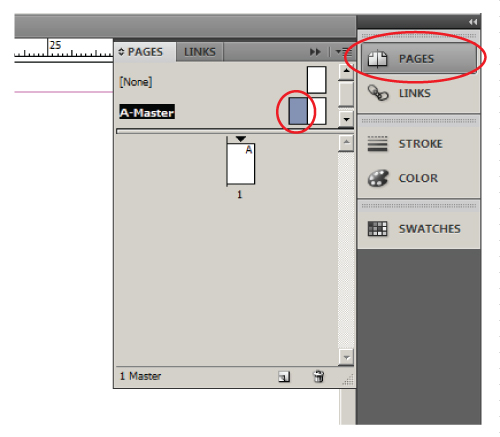
Before entering the content, you should first set the basic layout; setting the page number, and adjusting the placement of the Header / footer, with a click on the 'Pages' menu, and then double-click on the Master menu. 'Master Page' is the default page for all documents that you create, in other words: anything that you input in Master Page (either text, pictures and margin settings) will appear on every page.

Create a Basic Page Layout in Adobe InDesign

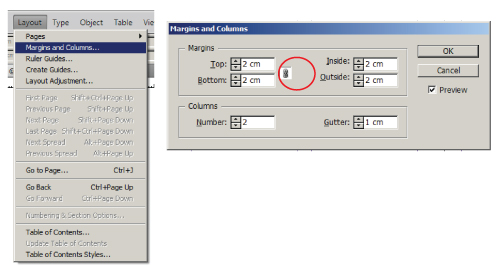
To set the margins (make sure the pages are still in the Master Page), you need to to a non-active (click) the icon link to a different input sizes.

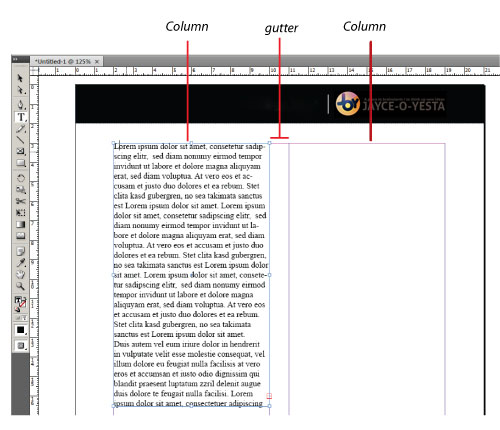
PS: for those of you who are accustomed to using MS Word, perhaps the mention of the margin setting is somewhat different though is the same principle. If in MS Word: 'Left and Right', then in InDesign would be: 'Inside and Outside'. On the menu 'Columns': 'Number' function in determining the number of lines of text that you want to make, and 'Guttter' is the distance between the line stretcher. Please just improvise in this section as needed. In this tutorial, Jayce-o-Yesta using columns '2 'with '1 cm gap'.

step 4

Create a Basic Page Layout in Adobe InDesign

To create a Header / Footer, you just need to write the text by clicking on the 'Text' (T) and then drag to make its text area (in InDesign, you must first create a text area in a way: click + drag). If the Header / Footer form an image, you can either input by copying images from Adobe Illustrator, etc.. or Ctrl + D to take pictures of the files on the computer.

step 5

Create a Basic Page Layout in Adobe InDesign

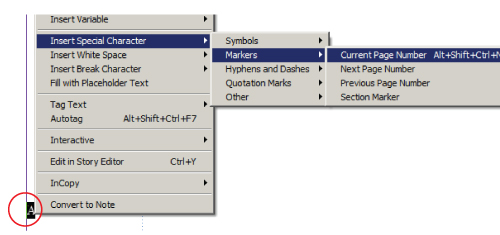
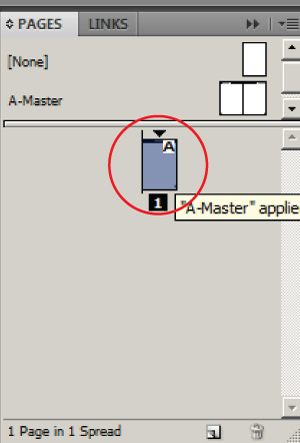
For inputting "Page Number", enter the text (T) by dragging it, type any letter, select the letter, and right click, then you will see a new menu, select 'Insert Special Character' / 'Markers' / 'Current Page Number'. So any letters that you input before changes to the letter "A". It is tailored to the title of Master Page (A-Master). Copy Page Number which has been set to the next page (in the Master Page there are two pages of the Master).

step 6

Create a Basic Page Layout in Adobe InDesign

If all the layout of the 'Master' is ready, the next is: double-click on sheet 1 (worksheet). On this sheet you will make the input text and images you need for the document.

step 7

Create a Basic Page Layout in Adobe InDesign

Click the Text (T) and then drag to make the necessary text area, type your text or content (in this example I customize the text area with a layout that was created earlier)

step 8

Create a Basic Page Layout in Adobe InDesign

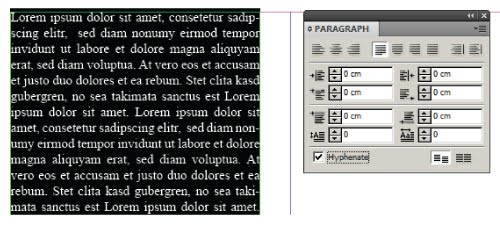
To set the paragraph, go to Window / Type & Tables / Paragraph (Ctrl + Alt + T) and set the paragraph that you want.

NB: enable "Hyphenate" to display a hyphen in paragraphs break, or turn off to remove it.

step 9

Create a Basic Page Layout in Adobe InDesign

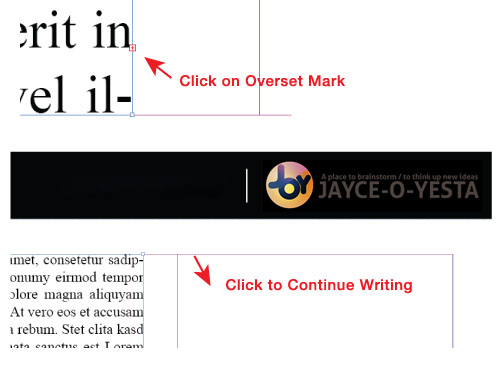
If your writing is truncated at the end of the column, then the sign of 'Overset Text' will appear. Click the sign to pop up a preview of small text on your cursor. Point your cursor to the next column and click on it, it automatically resume the truncated writings.

step 10

Create a Basic Page Layout in Adobe InDesign

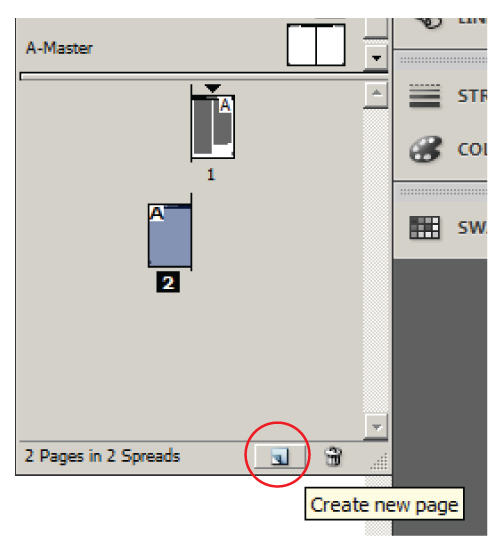
If you want to add the number of pages, click on the 'Create new page'. You can continue your writing on the advanced page. Now look, 'Page Number' which you have set on the 'Master Page' had now appeared in a sustainable manner. as well as Header / Footer that you created.

step 11

Create a Basic Page Layout in Adobe InDesign

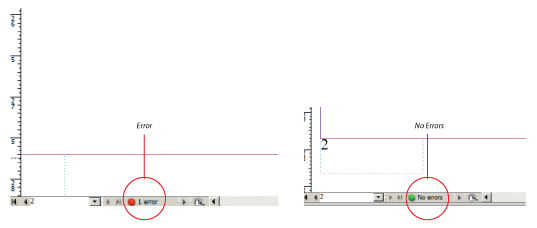
Before you save the file, note the 'preflight Panel' at the bottom left corner of the window bar of InDesign. This sign will be colored red if there are errors in the document that you create. Error can be caused because there is still a missing link files in the file that you input or overset text.


step 12

Create a Basic Page Layout in Adobe InDesign

If you are finished, you can save your document in InDesign format (. Indd) to continue it later on, or you may save it in the PDF format if everything has been completed.

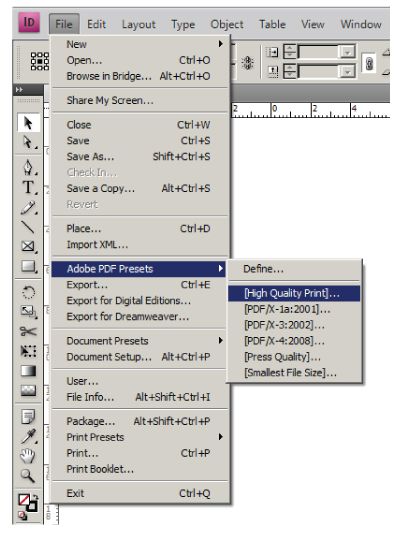
Saving in PDF Format:

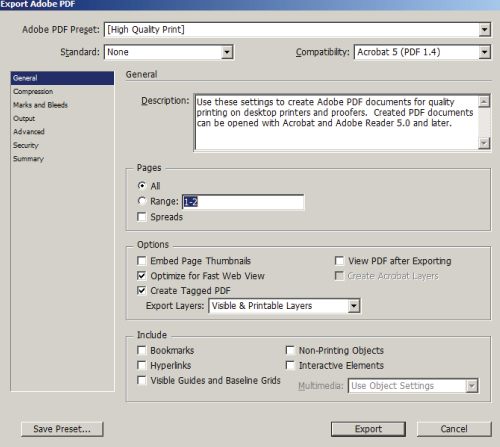
File/Adobe PDF presets/High Quality Print.

Create a Basic Page Layout in Adobe InDesign

Choose the destination file storage, and then click OK. This will bring up a 'Export Adobe PDF' window, click 'Export' and wait until it's done.
 
Support : Creating Website | Johny Template | Mas Template
Copyright © 2011. Tutorials Blogger - All Rights Reserved
Template Created by Creating Website Published by Mas Template
Proudly powered by Blogger