Featured Post Today
print this page
Latest Post
Showing posts with label Photoshop. Show all posts

10 Creative Videos Inspired by Photoshop

Creative Videos Inspired by Photoshop
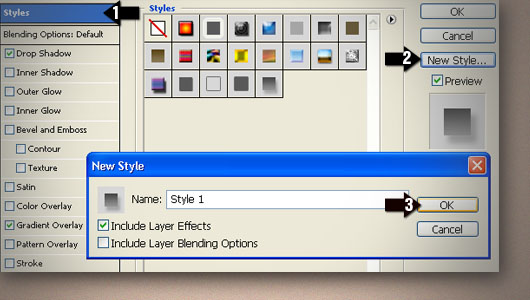
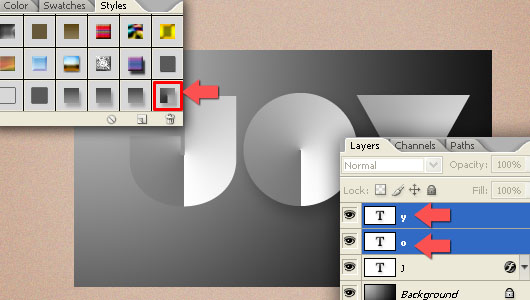
Photoshop is not just a regular editor software. It has become a trend and a part of world culture today. The word 'Photoshop' is commonly used to refer to the process of image manipulation. Photoshop also has inspired many people to do creative things and even bizarre. In this article I'm gonna show you ten creative videos inspired by Photoshop.

1. Adobe Photoshop Cook


A video made in stopmotion for competition AdobeYouGC. The simulation of a tutorial which shows how to make the lovely butter cookies with the new Adobe Photoshop Cook! Whole set was made with cardboard and with kitchen utensils.


2. Photoshop in real life - music video


Photoshop has become such a major tool in the daily lives of anyone with who is a little bit tech-savvy. With a few minor (or major) adjustments that terrible picture of you on your birthday can become your best picture ever and make it onto your Facebook profile. And with that in mind, YouTube comedy duo "RhettandLink" have created this hilarious music video dedicated to Photoshop in our daily lives.


3. More Photoshop CS5 Content-Aware Fill Sneak Peek Awesomeness


This video contains a parody of the new features in Adobe Photoshop CS5 Content Aware Fill. Content Aware Fill is an automatic feature that they can picture based on the pixels around it. In this video, Content Aware Fill used to do homework :D.


4. Photoshop Kazoo


This reative video was made only with Photoshop. The whole scene is still images arranged in hundreds of layers. The layers are arranged one by one to create an animation.


5. Photoshop Tutorial Rap


I'm sure you've seen enough Photoshop video tutorials. But this one is completely different, it's sung in a rap song!


6. Photoshop’s New PhotoBomb Tool


The images we capture are often flat. To fix this, Adobe has developed a new feature: PhotoBomb. This tool will add a surprise into your photos in a variety of options, one of whom is a drunk man in various poses.


7. dekePod: 101 Photoshop Tips in Five Minutes


In this video, Deke McClelland, a Photoshop guru-sing 101 Photoshop tips in just five minutes.


8. Real Life Photoshop


Thats what happens when photoshop meets reality. Just use the eraser tool ;)


9. World Without Photoshop


Imagine a world without Photoshop. A short film by The Chopping Block.


10. Imagining a World Where Photoshop Tools Exist in Real Life


I Have PSD” is a creative stop-motion short film by Hyperakt imagining what life would be like if Photoshop features could be used in real life — a world in which fixing life’s small problems are as easy as correcting a photograph.

5 Soft Gradients Effects For Photoshop

Soft Gradients Effects For Photoshop
Some of the following gradient suitable for photo processing, photography, image manipulation, and so forth. I made this gradients to facilitate you in your Photoshop projects, because sometimes when we work using Photoshop software we often find it hard to find the right color.

I have chosen the natural colors according to the color harmony that spoil the eye of the beholder. With regard to the exact color will relate to the meaning and philosophy of color. The colors used to portray certain things you would like. I will include the use of these gradations of colors for easy in use.

Soft Gradients Effects For Photoshop

Soft Gradients Effects For Photoshop

1. Crimson


Soft Gradients Effects For Photoshop

Used as a background as a staging opera, this impressive luxury gradation is suitable for the background that requires old-fashion impression.

2. Yellow


Soft Gradients Effects For Photoshop

Fun, clean, bright and vibrant feel suited to background project for children, and or youth leader.

3. Green


Soft Gradients Effects For Photoshop

The color is cool and the nuances of forest would be very suitable for eco-friendly residential projects and related projects that prefer a "back to nature"

4. Blue


Soft Gradients Effects For Photoshop

It is very suitable to use this color for projects related to education field.

5. Grey


Soft Gradients Effects For Photoshop

The impression of high technology is very suitable for the computer field

Create a Scissors-cut Type Effect in Photoshop

Scissors-cut Type Effect in Photoshop
In this photoshop tutorial, you're going to learn how to create a scissors-cut type effect in photoshop. This tutorial is simple and easy to follow. We only use the layer style to create the effect. In addition,  the simple technique to save the style to be applied to other layers is also quite important to know in order to save time and effort in doing a work. So, lets get started!

Step 1


Start by preparing the background color. Give a radial gradient color from gray to black color like the picture below.

Scissors-cut Type Effect in Photoshop


Step 2


Prepare the text, in this example Im using Lot font that you can download it here. Make sure each letter in the text have their own layer

Scissors-cut Type Effect in Photoshop

Step 3


Let start from the layer 'j' to give a torn paper effect on the letter J. Double click on the layer 'j' it will open a window called layer styles. Then Select gradient overlay, and set the opacity setting, gradient, style, angle, and scale as in the picture below. tick on the preview to see changes directly.


Step 4


Still on the layer style on layer 'j', then click on the drop shadow to give a little shadow on the text. Set the values contained in the drop shadow as shown below.

Scissors-cut Type Effect in Photoshop

Step 5


Next, select the style (located on the top row), then click on the new style. This move means we will save the settings in the layer style to later be applied to other layers.

Scissors-cut Type Effect in Photoshop

this is the result of giving a gradient overlay layer style and drop shadow to the layer 'j'

Scissors-cut Type Effect in Photoshop

Step 6


Now, go to Window -> Styles to open the Styles palette. Select the layer 'o' and the layer 'y' and then click on the icon style that you'd save. So automatically, the layer 'o' and the layer 'y' has the same style as the layer 'j'

Scissors-cut Type Effect in Photoshop

Step 7


Double click on layer 'o' and click on Gradient Overlay to do a little editing. You will change the angle effect on the layer of paper cutouts 'o' to 149 ° (see picture below).

Scissors-cut Type Effect in Photoshop

Step 8


After changing the angle, we also need to raise slightly upward effect on the letter 'o'. With the layer style window remains open, we only need to click and drag to adjust upwards the effect its position in the text.

Step 9


With the same way, also edit the angle of the gradient overlay layer effect 'y' to 66 °.

Scissors-cut Type Effect in Photoshop

Ok now here's the layer palette condition after making the cut Scissors-style effect on the text is complete.

Scissors-cut Type Effect in Photoshop

The final result


Thus the end result of giving some effect, and it's always good if you want to do more with it. This Photoshop tutorial is expected to be useful to be applied to creative projects that you do.

Scissors-cut Type Effect in Photoshop

Masking Basic Technique in Photoshop

Basic Technique in Photoshop
With this simple and easy technique, we will process an ordinary photo into a work of stunning. Masking is very useful because it does not destruct or alter the original image.


I prefer to use masking rather than eraser tool, because masking effect doesn't destruct the original photo, beside it can be easily remove (the masking effect) if someday there will be a change or revision).

Masking Photoshop

You can download the Photo Stock, paper texture, watercolor brush1 and brush2 that we will use. I will prepare the documents you can download at the end of the post.

So, if you're ready all, let's get started!


Step 1
Open documents in Photoshop

Masking Photoshop

Then change the "Background" layer which is locked into "Layer 0" by Double Click on it.

Masking Photoshop

Step 2
This is the core of this tutorial. Change the name "Layer 0" to "Picture".

Create a new layer (layer 1) below the "Picture" layer and then Right Click on "Picture" layer and select Create Clipping Mask.

Masking Photoshop

The Picture will be lost. Dont worry :) because it is. Go to the next steps.

Step 3
Time to experiment! Click on layer one, and start using the brush you've downloaded earlier. By applying the brush on "layer 1" , so the image will begin to appear (this can be called Unmask).

Masking Photoshop

Masking Photoshop

Do not forget to change the name of "Layer 1" to "brush".

Step 4
Use paper textures you've downloaded as the background on the work. This is a personal choice, you can use a background texture and other according to your own tastes.

Masking Photoshop

we're done! Quick and easy isn't it?

arranged a little Brightness / Contrast and level on the texture of paper and image. And also reduce the saturation on the photo, the result looks like this.

Masking Photoshop


Hair Coloring Tutorial

hair color photoshop tutorialexercises that I share with you the following expertise including "base" in learning Adobe Photoshop, and outside there are so many other ways that may be easier than on my way in this tutorial. If you want understanding step by step tutorials that are much easier to be followed, I suggest you to use the tools (image) is exactly the same and you have to be creative with your own photo.


hair color photoshop tutorial


hair color photoshop tutorial

STEP 1: duplicate layer
hair color photoshop tutorial
duplicate photos into two by way of 'stacked' in the layer (layer) with a view to separating the parts from a master image editing we do, such as hair part, the head, the eyes, etc. This is very important that the original photo (master photo) remained intact when the UNDO facility can no longer help you to get back miss crucial to the process previously.

Duplication steps:

* Open Photos with Adobe Photoshop application program with any version (recommended minimum CS versions)
* Come up with ways WINDOWS Layer Panel> Layers or press F7 on your computer keyboard
* After appearing as the above picture RIGHT CLICK PHOTOS> SELECT Duplicate Layer

STEP 2: select the hair area
hair color photoshop tutorial
The most appropriate tool to use is the Magnetic Lasso Tool (L), why? because the tool on the tool box are Adobe Photoshop you can easily along the edges of the hair on the above model is just like a magnet attached to a metal object only (hair) it will not stick to the timber body (skin), water (ear), fabric (clothes), etc. Truly a perfect tool: D. While in a cursory manner-how to use it is follows;

* Select / Click the layer to be edited on the layer panel to the right workspace (workspace) Adobe Photoshop.
* After that, select a tool (tools) called Magnetic Lasso Tool (or press "L" on your keyboard to be directly elected)
* Click once on the edge / side of the hair object
* After that, without pressing any button on the Mouse and Keyboard follow the edges of the hair photo model.

# If you have managed to down all the edges of the hair (like the example illustration above) and between points (nodes), the beginning and the end point has been met, you can DOUBLE CLICK on the end point so that both end points can be united
# Done

STEP 3 mask effect
hair color photoshop tutorial
To start editing the hair area selection results that we do this, go to menu Layer> Layer Mask> Reveal SELECTION. This was done so that whatever we wish to edit and delete will not affect the original photo, but it affects only the hair color area

STEP 4: Rename Layer
hair color photoshop tutorial
To make it easier to distinguish between the layer images with purple hair, you can change the name of the layer with the initials of your text at will (see example above), by: DOUBLE CLICK TEXT on Layer> Type the name> ENTER

STEP 5: Changing COLOR COMBINATIONS

hair color photoshop tutorial
In this step you we will make an alias of different combinations of their color, you need to do is play with the six combinations of primary colors R (Red), G (Gree), B (Blue), C (cyan), M (Magenta), Y (Yellow), just simple steps:

* See the layer (layer) of new hair that you have duplicate and rename the previous
* CLICK PHOTO BOXES ONCE on the left side or CLICK ONCE Background paper copy
* Press the Ctrl (control) + "B" on your keyboard to display the Color Balance panel or you can enter the menubar Image> Adjustments> COLOR BALANCE
* After the color menu appears like the image above arrange for color composition layer mask like the example above


DONE
hair color photoshop tutorial

Free model stock from: ~Model-ARIA--STOCK

Twitter Background Tutorial

Twitter Background Tutorial
I'm sure most of us have a Twitter account, but some are still using the standard background designs from Twitter.
The background is an effective field to promote your Blog (other than an update tweets).

Twitter Background Design

Knowing the Twitter background size
Lets look at this Twitter background. White field in the middle (content area width 764 pixels) will always remain in the middle and large white regardless of monitor resolution that we use. And because it's been a lot of users who are using widescreen monitors, so then there will be an empty space (a total of 250-300 pixels) on the left and right.

twitter background design

Way the background work
If we use our own design, Twitter will automatically put our designs start from the top left corner. So that will have leftover space that can not be covered by our designs. The solution: we can equate our design background color with the Twitter's background color than we can arrange ourself in "Settings" menu.

twitter background design

The second solution is to use a background that can be repeated (repeated pattern). It will be fine at any monitor resolution. But the bad side is, it will be difficult to put additional info on the pattern, because it will look odd if "our web address shown repeatedly.

twitter background design
The ideal size
Monitor with 1024 x 768 pixel resolution has become a standard . But many are also using higher resolution, just for your info, I'm using a widescreen 1360 x 768 Pixels.

Diversity of the current monitor size, requires us to design with larger size, namely the document width and height of 1600 Pixels 1024 Pixels, then you will have a comfortable Twitter background seen until 1600 widescreen resolution, if there is still remaining space that can not be closed, we can use a trick :by equating the background color (a fade-out impression on a certain field).

twitter background design

Here are some examples of Twitter background design that can inspire you to design your own background. Enjoy

Jayce-o Corner

Twitter Background Design

KimDeanArt

Twitter Background Design
Mayhemstudios

Twitter Background Design
Ithinkmedia

Twitter Background Design
G_obieta

Twitter Background Design

So Which is better? using a pattern or ideal size (large) as the above?

It all depends on your need, if you need to display certain information, the best solution is by using the ideal size background. But if you do not need to display any info, you can use a pattern for best results at any resolution monitor.

there is no limit, use your own creativity as much as possible! :)
 
Support : Creating Website | Johny Template | Mas Template
Copyright © 2011. Tutorials Blogger - All Rights Reserved
Template Created by Creating Website Published by Mas Template
Proudly powered by Blogger